DIYThe Common Creative: DIY
Showing posts with label DIY. Show all posts

Thursday, October 9, 2014

Free Printable: Thanksgiving Placecards

For those of us here in Canada, Thanksgiving comes quickly once Autumn rolls around. In fact, I already celebrated with M's family this past weekend. But this coming weekend marks the official day and I thought I'd put a little something together for you to be prepared. And if you're American, well, you'll be REALLY prepared. If you're into setting place cards for everyone around the Thanksgiving table, then you'll want to take advantage of this little freebie- hand painted and autumn inspired. Just click on the link below to download a PDF template ready for printing.
Kristen, the table's set for you. Come and celebrate with me, please? I'll be waiting...Oh. And click below to make one for me.


Monday, May 26, 2014

Embroidered House Project + Pattern

Hey guys, I'm so excited to be posting this little DIY project with you! I've been happily planning and embroidering for the past few weeks in order to share this with you today. Lately, I've been so inspired by scandinavian folk design that a few of my paintings and drawings are filled with tiny little red cottages. Aren't they the cutest things? And since I started to paint them, I've been dreaming up other ways to incorporate them into our home (especially since my husband is Finnish- it only makes sense, right?). 

Embroidery has always been close to my heart. I first learned how to stitch from our amazing mom who is an expert when it comes to stitching of all kinds. I remember Kristen and I making our first embroidery projects on lazy summer afternoons- our days were always filled with carefree crafting during summer break! I'm sure mom was just trying to find ways to keep us busy, but learning from her instilled the love I have now for the simple task of creating a picture using only a needle and thread. There's something so essential to this art form. I feel as though it connects me to the women of the past, those who wove tapestries or worked on their children's clothing in craft circles. And if you've never tried any sort of needlework, I highly recommend starting with embroidery! It's so very simple, relaxing and can be done anywhere. So without further ado...
You will need:
-Pattern Print Out (link below)
-Fabric (any solid coloured cotton will do).
-Measuring tape
-Scissors
-Transfer Paper
(If you don't happen to have vintage hand-me-down paper from your grandmother...try looking at a fabric store. It'll probably cost more than 49 cents, but shouldn't be too pricey!)
-Embroidery Floss in the colours you like. 
I chose a deep red, light grey, brown and white. Embroidery floss is one of my favourite things to buy. There are so many colours and each one goes for about 40 cents! I buy mine from Michaels. 
-Embroidery Needles 
These needles have an end that are more blunt than regular sewing needles, which is great for not poking your fingers! If you don't have embroidery needles, you can use regular ones, but you may want to don a thimble!
-A Small Embroidery Hoop, such as this one. 
Embroidery hoops often run rampant at thrift stores and I pick up a few every time I go to have on hand. 
If you decide to make something out of your embroidery, you'll want to think about how the end product will look. I chose to make a pillow, but you can also use this pattern and make it into anything you like, such as a wall hanging or felt coaster! If you choose to make the pillow, you'll want to cut your piece of fabric 1" larger than the dimensions of the pillow you're choosing to cover (I won't be explaining the pattern to my pillow, but I found a good tutorial here).

Begin by lining up the transfer paper (coloured side down) and the pattern on your piece of fabric. Make sure your transfer paper is facing the right way by testing it out on a scrap piece of fabric first. I also used painter's tape to secure it so it wouldn't move on me! This tape can be found at any local hardware or art supply store. Once everything is in place, you can begin to carefully trace the lines onto your fabric. Don't mind my gnarly grandma hands... thanks mom. 
Once your pattern is transferred, you're ready to begin sewing! Line up your hoop around the pattern and make sure to tighten into place. The fabric should be fairly taught, but not so tight that it stretches and skews the pattern. Once your hoop's on, you can choose your first colour to start- this is where your artistic license comes in :)
I'm no expert in stitching (yet!) and there are SO many stitches to learn! I plan on learning and practicing some new ones over the next while, but I used three really basic stitches for my project. If you haven't learned any embroidery stitches before, I suggest taking some time to learn and practice a few stitches before getting started. Here are some tutorials for the stitches I was using: 
Once you have the hang of it, it's easy to just start filling in the lines! So turn on your favourite show, make a cuppa tea, hunker down for the evening and start sewing! Below are some shots of my finished product- I think if I were to do it again, I'd blow up the pattern to make a larger house, but I'm still happy with the end result. I have to admit, I'm a little nervous to be posting a shot of my living room, as it's a work in progress, but at least it's clean and I've now added one more detail to beautify it! Also below is the link to download the pattern. Happy Stitching! 

Monday, April 14, 2014

DIY Birdhouse with Homemade Bird Seed (plus Giveaway Winner!)

"Feed the birds, tuppence a bag..." remember this song from Mary Poppins? I always liked that poor old bird lady who sang it. Sure, she may have been a bit odd, but who isn't? Recently, I was looking out of my house, listening to the busy whir of cars and realized that I have not once seen a bird outside of my window! I'm not a huge bird lover or anything, but I do highly appreciate the sound of chirping birds in the springtime. Today's DIY is the hopeful cure to one of the city dweller's problems. And not only is it cute, it's not a time-consuming craft. You could probably finish this one in 20-30 minutes. Let's get started, shall we?
You will need a few simple supplies for the birdhouse:
-It would be so impressive to make your own, but I found my birdhouse at our local craft store, Michaels. 
-acrylic paint (I chose a lovely teal colour, which happens to be close to a robin's egg blue!)
-gold foil or something of the like to decorate the roof. You could also use wood veneer to make shingles. 
-paintbrush
-glue or acrylic medium
This part is simple enough. Start off by painting the house, adding your own unique touches as you go. I chose to paint a white rim around the hole of the house! 
Once dry, add your roof. I chose a gold transfer foil...but unfortunately the transfer part wasn't working so well on the wood, so I ended up using acrylic medium to adhere the paper. You could use anything you like to create a roof- paint, wood, cork...etc.
Ooooh so shiny. Maybe this will draw the birds to me (and hopefully not just black birds). If you live in a rainy climate like I do, it might be good to add a coating of some kind to protect it from rain, but I'm just going to hang it underneath a protective balcony :). Ok, onto the bird seed!
You could just buy seed for your birds, but often the mixes aren't catered to specific birds and include a ingredients that may attract unwanted species. Also, who wants to buy when you can make?? Here are some supplies you'll need to make the seed. Depending on which birds you want to attract, you'll want to select a few to make a custom blend! 
-unsalted peanuts. DO NOT use salted or dry roasted. Peanuts attract greenfinches, house sparrows. Crush them up and you'll attract robins and wrens!
-sunflower seeds. Generally, attract a variety.
-steel cut oatmeal (never cook it!)
-millet to attract house sparrows
-berries
-popped popcorn
-nyger seeds to attract goldfinch
-old bread/croutons for sparrows
-wheat & barley grains for pigeons, doves, and pheasants
-split peas, beans, dried rice and lentils for larger species
-flaked maze to attract black birds (but do you really want to? really??)
Once you have your ingredients chosen, time to start mixing! 
Now that looks like a feathered friend feast! If you want more ideas on ways to attract birds (such as making bird seed cakes, suet and more), visit this site for some great tips on feeding specific birds.
Happy bird watching! 

-Jenni

p.s. We have our giveaway winner! Congratulations to Melanie Rempel on winning the necklace! We'll be sending you an email soon to confirm your address. 

Wednesday, April 9, 2014

Newlywed Nesting: Seasonal Decor

As Jenni and I are both newly married, these past few months we've been able to settle into our homes with those men we now call husbands. With our newest feature, newlywed nesting, we hope to show you a little of the creative projects we are working on in our respective homes.
Jordon and I live in a small basement suite. It's cozy, it's really nice, but it doesn't have too many windows. Just another reason to get more creative with my decor to make it feel cheery, even without the sun streaming in. 
I've decided there are a few places in our house that I like to change seasonally, these are two of them.

First, is my little glass covered terrarium. This was something we used during our wedding as we had a plethora of succulents as additions to our day. Now, it sits on our coffee table. I like to change its contents seasonally to reflect what's going on out of doors. So far, I've had red berries, some pebbles, and now these lovely everlasting flowers. Yes, they are fake. But what better way to preserve florals in a sun-less plaace?
Second, I like to change our clipboards in our living room. Yes, framed art is changeable, but who really takes the time to change it? I don't. Clipboards are so easy. I've had some prints and pieces from people I know, but currently they are images gathered from many places. I like the springy, muted colours they are representing currently. 
And yes, more fake flowers. I really do prefer real blooms, they make their way into these vases occasionally!
Just a few small things I like to do to give our home some reflections of the seasons. Do you decorate seasonally? 

Don't forget to enter our giveaway here! Closes Monday!

Kristen

Friday, March 28, 2014

Curated by Kristen


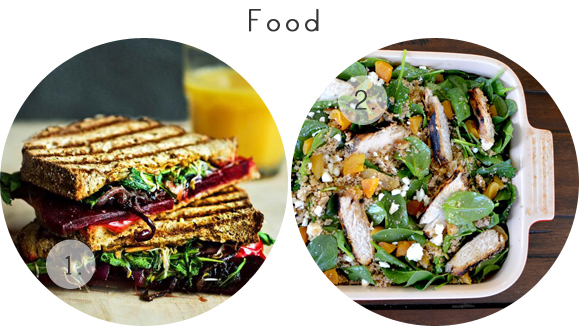
1. I've been craving light summer foods as the weather warms. This sandwich looks like a perfect combination of light ingredients with a bit of spice!

2. Apricots also remind of summer. In a couscous balsamic chicken dish? Perfect. 

3. I saw this chair at Crate & Barrel last week and have been thinking about it ever since! Reminds me of the old school desk Jenni and I used to 'play school' with as kids. 

4. I've been loving everything copper lately. This repurposed pipe is such a neat idea to make your least pretty room a little prettier. 

5. More copper! I have to get some of this copper contact paper to make these cute little planters. 

6. I know that both Jenni and I have seen mounds of unused wallpaper at thrift stores. This spring wreath is such a neat use of it! I think I might just have to make this. 

What things are you finding that inspire spring? Have a wonderful weekend!
Related Posts Plugin for WordPress, Blogger...